HarmonyOS App开发之组件布局类
2022-02-07 Candy.W
加入收藏
今天继续分享有关 HarmonyOS 系统的开发组件布局类的知识,我们将在此系统上进行 App 应用开发,主要内容是讲常用的组件布局类有哪些以及它们的使用方式。
分享的逻辑是先学习布局的含义,再讲解应用框架及示例代码的调用逻辑,最后讲解运行效果图,大致是按照这种三步曲的节奏来分享。
第一步:常用组件布局的含义
- TableLayout 意为表格布局,也可以称为网格布局,允许我们使用表格的方式来排列组件,也就是行和列的方式。
- StackLayout 意为堆叠布局,用于在屏幕上保留一个区域来显示组件,实现特殊的功能。通常,堆叠布局中只应该放置一个子组件,如果存在多个子组件,则显示最新的子组件。
- DirectionalLayout(单一方向排列布局)是 JAVA UI 的一种重要的组件布局,用于将一组组件按照水平或垂直方向排布,能够方便地对齐布局内的组件。【ohos:orientation="vertical" 默认为垂直方向,可以换成ohos:orientation="horizontal"水平方向】
- DependentLayout 意为相对位置布局,与 DirectionalLayout 相比较有更多的排布方式,每个组件可以指定相对于其他同级组件的位置,也可以指定相对于父组件的位置。可以使用 DependentLayout 布局来实现更加复杂的UI界面,同时也可以和其他布局相结合组合出需要的UI界面。
第二步:系统框架及代码调用逻辑
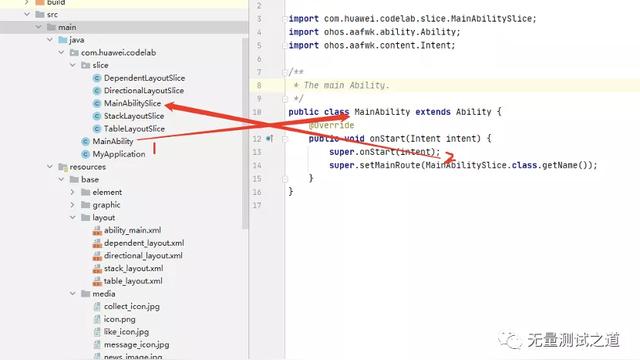
系统框架在里面只用图片展示一下,不做详细说明,前期分享的文章:HarmonyOS (鸿蒙操作系统)你值得拥有 有详细说明过,如下:
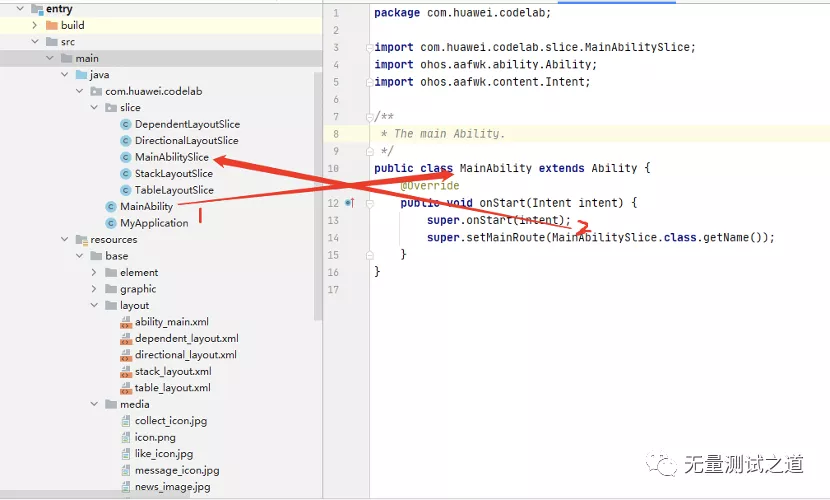
MainAbility 就是程序的main入口类,这里会调用到 setMainRoute 的方法,传入的是MainAbilitySlice 这个类名称。此类的核心代码为:
 1@Override
 2public void onStart(Intent intent) {
 3    super.onStart(intent);
 4    super.setUIContent(ResourceTable.Layout_ability_main); // 这里实际上是要去加载ability_main.xml 布局文件,这里在前面加上一个Layout_ 是系统要求这样做的,表明这是一个布局文件,布局文件详情在下面有详细列出。
 5Button btn_directional = (Button) findComponentById(ResourceTable.Id_directional_layout); // 这里实际上是在从ability_main.xml 文件中找id 为 directional_layout的元素,并强转为Button类型
 6        if(btn_directional != null){ // 判断非null
 7            btn_directional.setClickedListener(new Component.ClickedListener() { //给此id 元素设置监听事件
 8                @Override
 9                public void onClick(Component component) {
10                    present(new DirectionalLayoutSlice(),new Intent()); // 当此id元素被点击时,就去渲染DirectionalLayoutSlice这个类对象,这里的Present()是用来实现不同的page(ability)内的跳转。
11                }
12            });
13        }
14
15        Button btn_dependent = (Button) findComponentById(ResourceTable.Id_dependent_layout);
16        if(btn_dependent!=null){
17            btn_dependent.setClickedListener(new Component.ClickedListener() {
18                @Override
19                public void onClick(Component component) {
20                    present(new DependentLayoutSlice(),new Intent());
21                }
22            });
23        }
24
25        Button btn_stack = (Button) findComponentById(ResourceTable.Id_stack_layout);
26        if(btn_stack != null){
27            btn_stack.setClickedListener(new Component.ClickedListener() {
28                @Override
29                public void onClick(Component component) {
30                    present(new StackLayoutSlice(),new Intent());
31                }
32            });
33        }
34        Button btn_table = (Button) findComponentById(ResourceTable.Id_table_layout);
35        if(btn_table != null){
36            btn_table.setClickedListener(new Component.ClickedListener() {
37                @Override
38                public void onClick(Component component) {
39                    present(new TableLayoutSlice(),new Intent());
40                }
41            });
42        }
43    }
ability_main.xml 详细内容如下:
 1<?xml version="1.0" encoding="utf-8"?>
 2<ScrollView //滚动视图组件
 3    xmlns:ohos="http://schemas.huawei.com/res/ohos"
 4    ohos:width="match_parent"
 5    ohos:height="match_parent"
 6    ohos:rebound_effect="true"
 7    ohos:layout_alignment="horizontal_center"> //表示是水平居中
 8    <DirectionalLayout
 9        ohos:width="match_parent"
10        ohos:height="match_content"
11        ohos:orientation="vertical">
12        <Text
13            ohos:width="match_content"
14            ohos:height="match_content"
15            ohos:text="Common layout"
16            ohos:text_color="#708090"
17            ohos:top_margin="15vp"
18            ohos:left_margin="10vp"
19            ohos:text_size="25fp"/>
20        <Text
21            ohos:background_element="#70dbdb"
22            ohos:width="match_parent"
23            ohos:height="3"/>
24        <TableLayout
25            ohos:width="1080"
26            ohos:height="match_content"
27            ohos:orientation="horizontal"
28            ohos:top_margin="10"
29            ohos:column_count="2">
30            <Button
31                ohos:id="$+id:directional_layout"
32                ohos:width="500"
33                ohos:height="120"
34                ohos:margin="5"
35                ohos:padding="2"
36                ohos:text="DirectionalLayout"
37                ohos:text_size="17fp"/>
38            <Button
39                ohos:id="$+id:dependent_layout"
40                ohos:width="500"
41                ohos:height="120"
42                ohos:margin="5"
43                ohos:padding="2"
44                ohos:text="DependentLayout"
45                ohos:text_size="17fp"/>
46            <Button
47                ohos:id="$+id:stack_layout"
48                ohos:width="500"
49                ohos:height="120"
50                ohos:margin="5"
51                ohos:padding="2"
52                ohos:text="StackLayout"
53                ohos:text_size="17fp"/>
54            <Button
55                ohos:id="$+id:table_layout"
56                ohos:width="500"
57                ohos:height="120"
58                ohos:margin="5"
59                ohos:padding="2"
60                ohos:text="TableLayout"
61                ohos:text_size="17fp"/>
62        </TableLayout>
63    </DirectionalLayout>
64</ScrollView>
接下来当我们点击到id 为Id_directional_layout 这个button时,就会跳转到present(new DirectionalLayoutSlice(),new Intent()); 这个类文件,其文件内容为:
1public class DirectionalLayoutSlice extends AbilitySlice{
2    @Override
3    public void onStart(Intent intent) {
4        super.onStart(intent);
5        super.setUIContent(ResourceTable.Layout_directional_layout);
6    }
7   }
从代码里面可以看得到,这里面是去渲染了一个directional_layout的页面布局文件。来看下这个文件的内容:
 1<?xml version="1.0" encoding="utf-8"?>
 2<DirectionalLayout
 3    xmlns:ohos="http://schemas.huawei.com/res/ohos"
 4    ohos:width="match_parent"
 5    ohos:height="match_parent"
 6    ohos:top_margin="13fp"
 7    ohos:orientation="vertical">
 8    <Text
 9        ohos:width="match_content"
10        ohos:height="match_content"
11        ohos:text="道理不光要懂,还要践行"
12        ohos:text_alignment="center"
13        ohos:multiple_lines="true"
14        ohos:layout_alignment="center"
15        ohos:top_margin="20vp"
16        ohos:text_size="23vp"/>
17    <Text
18        ohos:width="match_parent"
19        ohos:height="match_content"
20        ohos:text="1.持续学习可以使你保持自信"
21        ohos:multiple_lines="true"
22        ohos:left_margin="20vp"
23        ohos:top_margin="20vp"
24        ohos:text_size="18vp"/>
25    <Text
26        ohos:width="match_parent"
27        ohos:height="match_content"
28        ohos:text="2.别人有背景而你只有背影,你需要努力"
29        ohos:multiple_lines="true"
30        ohos:left_margin="20vp"
31        ohos:top_margin="20vp"
32        ohos:text_size="18vp"/>
33    <Text
34        ohos:width="match_parent"
35        ohos:height="match_content"
36        ohos:text="3.你不努力没有人替你坚强"
37        ohos:multiple_lines="true"
38        ohos:left_margin="20vp"
39        ohos:top_margin="20vp"
40        ohos:text_size="18vp"/>
41    <Text
42        ohos:width="match_parent"
43        ohos:height="match_content"
44        ohos:text="4.当今注意力是稀缺资源,你应该将注意力放在有价值的事情上"
45        ohos:multiple_lines="true"
46        ohos:left_margin="20vp"
47        ohos:top_margin="20vp"
48        ohos:text_size="18vp"/>
49</DirectionalLayout>
其中的每一行就不再做详细解释了,总体的意思是有一个标题头,它居中展示,字体要大一些。然后就是四个带有标签1,2,3,4的文本内容。
第三步:运行后的效果展示
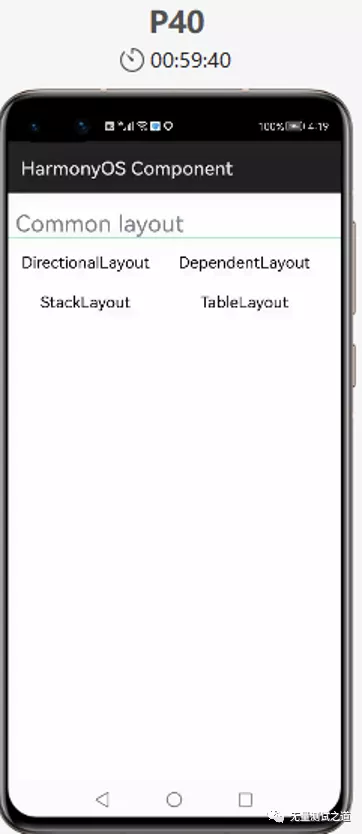
下图是进入的主页面:
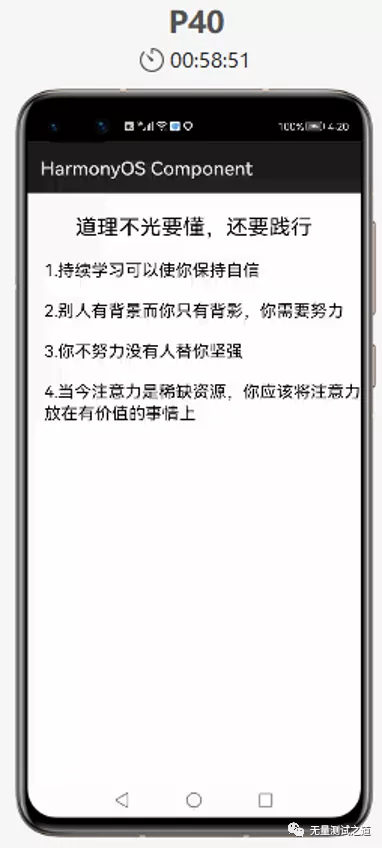
下图是点击“DirectionLayout”按钮后的页面:
下图是点击“DependentLayout”按钮后的页面:
下图是点击“StackLayout” 按钮后的页面:

下图是点击“TableLayout”按钮后的页面:
总结:
- 由于篇幅有限,此处不再把每一个布局代码详细拿出来说明,通过上面的一个布局示例就能很清楚的了解其中的精髓。
- 本人因技术水平有限,如有错误之处望指出。