Asp.Net Core Identity 多数据库支持
Asp.NET Core Identity 是.Net自带的身份认证系统,支持用户界面 (UI) 登录功能,并且管理用户、密码、配置文件数据、角色、声明、令牌、电子邮件确认等等。使用Visual Studio创建带有identity的项目时,使用SqlServer作为缺省的数据库,本文介绍如何改造为多种数据库支持。
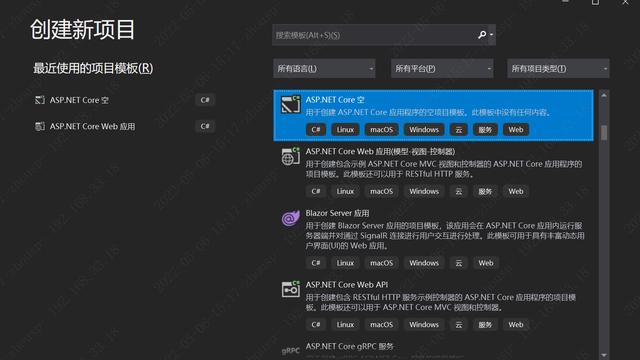
首先,使用Visual Studio 2022创建一个新的Asp.Net Core Web项目,名称为TestIdentity,选择身份认证类型为个人账户:
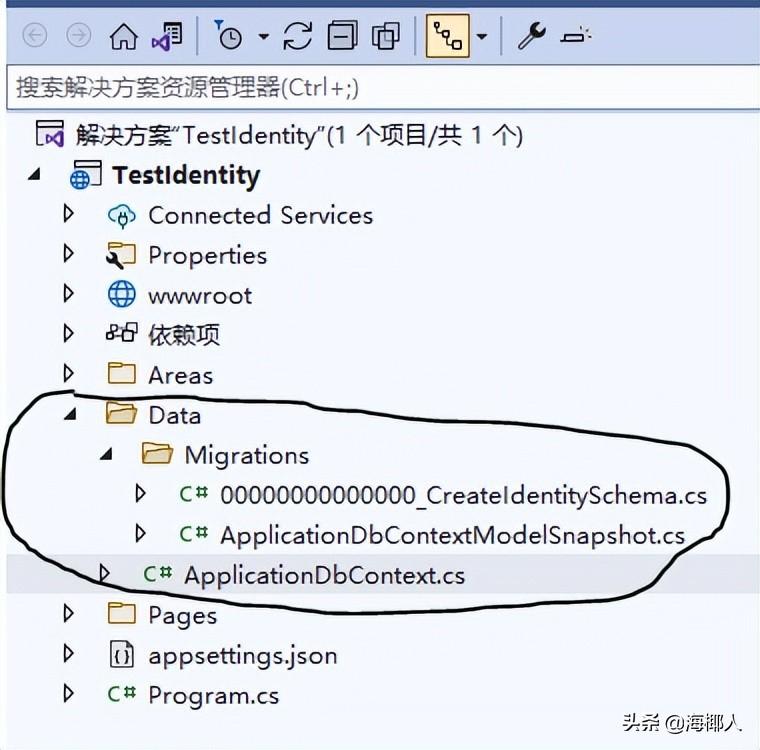
创建的项目结构如下:
在Data目录下保存的是身份认证的DbContext,名称为ApplicationDbContext,还有基于SqlServer的迁移文件。我们所要做的第一件事情是将SqlServer部分移动到另一个项目中,然后再增加对其它数据库类型的支持。
现在我们在解决方案中创建一个新的类库项目,名称为IdentityEF,在这个项目中安装包
Microsoft.AspNetCore.Identity.EntityFrameworkCore。然后将ApplicationDbContext移动到这个项目中。
然后我们再创建另一个类库项目,负责SqlServer数据库的迁移,名称为IdentityEF.SqlServer,在这个项目中安装包
Microsoft.EntityFrameworkCore.SqlServer和Microsoft.EntityFrameworkCore.Tools,还要增加对IdentityEF的项目引用,然后将TestIdentity中Data目录下的Migrations子目录移动到这个项目中:
然后在这个项目中增加新的类DbContextFactory,代码如下:
using Microsoft.EntityFrameworkCore;
using Microsoft.EntityFrameworkCore.Design;
using System;
using System.Collections.Generic;
using System.Linq;
using System.Text;
using System.Threading.Tasks;
using TestIdentity.Data;

namespace IdentityEF.SqlServer
{
    public class DbContextFactory : IDesignTimeDbContextFactory<ApplicationDbContext>
    {
        public ApplicationDbContext CreateDbContext(string[] args)
        {
            var optionsBuilder = new DbContextOptionsBuilder<ApplicationDbContext>();
            optionsBuilder.UseSqlServer("Server=(localdb)\mssqllocaldb;Database=aspnet-TestIdentity-53bc9b9d-9d6a-45d4-8429-2a2761773502;Trusted_Connection=True;MultipleActiveResultSets=true",
              x => x.MigrationsAssembly("IdentityEF.SqlServer"));
            return new ApplicationDbContext(optionsBuilder.Options);
        }
    }
}
请注意,上面的数据库名称与TestIdentity项目中appsettings.json中定义的DefaultConnection是一样的,这样,生成的数据库在TestIdentity中可以直接使用。
{
  "ConnectionStrings": {
    "DefaultConnection": "Server=(localdb)\mssqllocaldb;Database=aspnet-TestIdentity-53bc9b9d-9d6a-45d4-8429-2a2761773502;Trusted_Connection=True;MultipleActiveResultSets=true"
  },
  "Logging": {
    "LogLevel": {
      "Default": "Information",
      "Microsoft.AspNetCore": "Warning"
    }
  },
  "AllowedHosts": "*"
}
再增加一个依赖注入扩展IdentityEFExtension,方便在Web应用中的引用:
using Microsoft.EntityFrameworkCore;
using Microsoft.Extensions.Configuration;
using Microsoft.Extensions.DependencyInjection;
using System;
using System.Collections.Generic;
using System.Linq;
using System.Text;
using System.Threading.Tasks;
using TestIdentity.Data;

namespace IdentityEF.SqlServer
{
    public static class IdentityEFExtension
    {
        public static IServiceCollection AddIdentityEFSqlServer(this IServiceCollection services, IConfiguration Configuration)
        {
            services.AddDbContext<ApplicationDbContext>(options =>
                options.UseSqlServer(Configuration.GetConnectionString("DefaultConnection"),
                x => x.MigrationsAssembly("IdentityEF.SqlServer")));
            return services;
        }
    }
}
到这里,改造基本完毕,在Web应TestIdentity项目中,增加对这两个项目的引用,然后改造Program.cs,将原有的部分注释掉,增加AddIdentityEFSqlServer:
//// Add services to the container.
//var connectionString = builder.Configuration.GetConnectionString("DefaultConnection");
//builder.Services.AddDbContext<ApplicationDbContext>(options =>
//    options.UseSqlServer(connectionString));
//builder.Services.AddDatabaseDeveloperPageExceptionFilter();

builder.Services.AddIdentityEFSqlServer(builder.Configuration);
现在,可以在包管理器中,使用Update-Database创建数据库。首先,将IdentityEF.SqlServer项目设置为启动项目,在包管理器中,将缺省项目也设置为IdentityEF.SqlServer:
然后运行Update-Database,顺利的化,数据库就生成了。将启动项目改回到TestIdentity,运行项目,我们可以注册用户并进行登录了。到这里,针对SqlServer的部分已经从Web项目中分离,现在,我们增加对其它数据库类型的支持,比如,我们增加Sqlite的支持。
创建一个新的类库,名称为IdentityEF.Sqlite,增加程序包
Microsoft.EntityFrameworkCore.Sqlite和Microsoft.EntityFrameworkCore.Tools,还要增加对IdentityEF的项目引用,然后增加DbContextFactory:
using Microsoft.EntityFrameworkCore;
using Microsoft.EntityFrameworkCore.Design;
using TestIdentityEF.Data;

namespace IdentityEF.Sqlite
{
    public class DbContextFactory : IDesignTimeDbContextFactory<ApplicationDbContext>
    {
        public ApplicationDbContext CreateDbContext(string[] args)
        {
            var optionsBuilder = new DbContextOptionsBuilder<ApplicationDbContext>();
            optionsBuilder.UseSqlite("DataSource=mydatabase.db;",
                x => x.MigrationsAssembly("IdentityEF.Sqlite"));

            return new ApplicationDbContext(optionsBuilder.Options);
        }
    }
}
还增加依赖注入扩展:
using Microsoft.EntityFrameworkCore;
using Microsoft.Extensions.Configuration;
using Microsoft.Extensions.DependencyInjection;
using System;
using System.Collections.Generic;
using System.Linq;
using System.Text;
using System.Threading.Tasks;
using TestIdentity.Data;

namespace IdentityEF.Sqlite
{
    public static class IdentityEFExtension
    {
        public static IServiceCollection AddIdentityEFSqlite(this IServiceCollection services, IConfiguration Configuration)
        {
            services.AddDbContext<ApplicationDbContext>(options =>
                options.UseSqlite(Configuration.GetConnectionString("IdentityConnection"),
                x => x.MigrationsAssembly("IdentityEF.Sqlite")));
            return services;
        }
    }
}
项目的结构如下:
现在,我们需要生成迁移文件和数据库。将项目IdentityEF.Sqlite设置为启动项目,在程序包管理器中,将IdentityEF.Sqlite设置为缺省项目:
在程序包管理器中运行:
Add-Migration init
如果一切顺利,在项目文件中会增加迁移文件:
然后运行Update-Database,我们会发现,项目中多了db文件:
最后,改造一下Web应用,使其支持Sqlite数据库,并且可以通过配置文件进行切换。在项目中增加对IdentityEF.Sqlite的引用,然后修改Program.cs:
if (builder.Configuration["DbType"]=="SqlServer")
    builder.Services.AddIdentityEFSqlServer(builder.Configuration);
else
    builder.Services.AddIdentityEFSqlite(builder.Configuration);
在配置文件中使用DbType切换数据库的类型:
{
  "ConnectionStrings": {
    //"DefaultConnection": "Server=(localdb)\mssqllocaldb;Database=aspnet-TestIdentity-53bc9b9d-9d6a-45d4-8429-2a2761773502;Trusted_Connection=True;MultipleActiveResultSets=true",
    "DefaultConnection": "DataSource=D:\Asp.Net Core\TestIdentityEF\IdentityEF.Sqlite\mydatabase.db"
  },
  "DbType": "Sqlite",
  "Logging": {
    "LogLevel": {
      "Default": "Information",
      "Microsoft.AspNetCore": "Warning"
    }
  },
  "AllowedHosts": "*"
}
完整的项目代码可以从github下载:
https://github.com/zhenl/TestIdentityEF 。
文章来自
https://www.cnblogs.com/zhenl/p/16340890.html