简单分析实现运维利器---web远程ssh终端录像回放
背景
上次给大家介绍了实现基础的运维系统功能—webssh,今日书接上回,继续给大家介绍一个web远程ssh终端录像回放功能。
一、思路
网上查了一下资料,搜索了一下关于实现webssh录像回放的方案,大家统一都是使用asciinema!仔细看了相关技术文档之后更是二次确定!一开始以为需要视频文件,没想到,asciinema用特定的格式文件就可以实现视频流。(在写asciinemaweb技术的时候发现一个大坑,琢磨了将近两个小时,待会再详细说具体问题)
asciinema实际就是通过系统输出的信息,将信息写成asciinema特定的格式文件,包含header与data两大部分(也是待会从文章中讲解两部分的结构),它就能解析成视频。所以我们在上次的功能逻辑之上:
1.连接ssh成功后,构造头部内容写入文件中;
2.将开头两条输出信息以特定的格式写入文件中;
3.将线程监听回来的所有输出信息以特定的格式写入文件中(其中2.3已经包含了我们webssh所有的输出信息了,已经足以构成录像回放);
4.创建html页面展示回访列表。
二、实现
1.先说明一下asciinema文件的格式
头部:
    header = {
"version": 2,  #(asciinema)版本
"width": 160, #(asciinema)回放时的宽度
"height": 48, #(asciinema)回放时的高度
"timestamp": date, #(asciinema)时间戳 用于播放
"env": {"SHELL": "/bin/bash",  #(asciinema)使用的shell类型
"TERM": "xterm-256color"}, #(asciinema)终端颜色
"title": "video"  #(asciinema)标题
    }
data:
[0.00699162483215332, "o", "Last login: Thu May  7 18:42:13 2020 from 192.168.254.1rrn"]
[0.1905069351196289, "o", "[root@leestudy ~]# "]  #第一个字段为时间戳,第二个字段“o”为输出,“i”为输入,第三个字段为“(o)输出信息/(i)输入信息”
2.连接ssh成功后写入header
            sshsession = client.get_transport().open_session()
            sshsession.get_pty()
            sshsession.invoke_shell()
            asciinemadir = settings.BASE_DIR + '/static/asciinemadir/' #定义一个存放文件的目录(喜欢的也可以保存在数据库)
if not os.path.isdir(asciinemadir):
                os.makedirs(asciinemadir)
            starttime=time.strftime("%Y%m%d%H%M%S") #用于记录开始时间
            filena =ip+starttime         #文件名,用ip+开始时间为文件名
            date=time.time()             #开始时间戳
print(date)
            header = {
"version": 2,
"width": 160,
"height": 48,
"timestamp": date,   #开始时间戳
"env": {"SHELL": "/bin/bash",
"TERM": "xterm-256color"},
"title": "video"
            }
            writedata= open(asciinemadir + filena, 'w') #打开文件
            writedata.write(json.dumps(header) + 'n')  #将header写入文件
3.将开头两条输出信息以特定的格式写入文件中
for i in range(2):
                messa = sshsession.recv(1024)
                request.websocket.send(messa)
                demessa = messa.decode('utf-8')
                iodata = [time.time() - date, 'o', f'{demessa}'] #构造格式
                writedata.write(json.dumps(iodata)+'n') #写入文件
4.将线程监听回来的所有输出信息以特定的格式写入文件中
def srecv():
while True:
                    sshmess = sshsession.recv(2048)
if not len(sshmess):
                        print('退出监听发送循环,并关闭写入文件')
                        writedata.close()   #如果不再监听通道,则关闭文件
break
                    request.websocket.send(sshmess)
                    print('ssh回复的信息:' + sshmess.decode('utf-8'))
                    print(len(sshmess))
                    desshmess = sshmess.decode('utf-8')
                    iodata2 = [time.time() - date, 'o', f'{desshmess}']#构造格式
                    writedata.write(json.dumps(iodata2) + 'n')#写进文件
5.创建html页面展示回访列表
在创建html前需要创建一个新的表用于存放录像列表的信息
models下:
class video(models.Model):
hostaddress = models.CharField(max_length=255)
username = models.CharField(max_length=255)
filename = models.CharField(max_length=255)
starttime = models.CharField(max_length=255)
overtime = models.CharField(max_length=255)
####(创建好列表信息后需要进行数据库记录与迁移Python/ target=_blank class=infotextkey>Python manage.py makemigrations与python manage.py migrate)
接着在关闭websocket时创建一条数据,并且在关闭websocket时也关闭文件,判断是否关闭只要用try异常机制即可。
        except:
            addvideolist = models.video()
            addvideolist.hostaddress = ip
            addvideolist.username = request.session['username']
            addvideolist.filename = filena
            addvideolist.starttime = starttime
            addvideolist.overtime = time.strftime("%Y%m%d%H%M%S")
            addvideolist.save()
            writedata.close()
print('中断websocket,关闭文件写入')
接着创建html页面展示回放:
耗费将近两个小时的坑就是这个asciinemaplayer的js文件,在网上找了很多的asciinemaplayerjs文件,全部都不行!解析不出来!(解坑前根本不知道是JS的问题!)连官方下载的demo都解析不出来,demo都是在比较大型的网站中下载的,然后看了下官网(https://asciinema.org)里面的展示都是可以解析!demo都一模一样!最后就干脆找了一个demo的首页,点开F12直接找js!!结果一引用,竟然可以了。
最后给上js链接:
https://asciinema.org/js/asciinema-player-e90dd959bf7df7e1608c08ac419fca67.js?vsn=d
现在视图中创建页面函数:
def Videotape(request):
    videolist = models.video.objects.all()
return render(request, 'html/Videotape.html', locals())
然后再编写html页面(引用了AdminLte模板)
{% extends 'base.html' %}
{% load static %}
{% block title %}录像{% endblock %}
{% block css %}
<link rel="stylesheet" href="{% static 'adminlet-2.4.10/bower_components/datatables.NET-bs/css/dataTables.bootstrap.css' %}">
<link rel="stylesheet" href="{% static 'asciinemaplayer/asciinema-player.css' %}">
{% endblock %}
<!-- 顶部内容  -->
{% block breadcrumb %}
<!-- Content Header (Page header) -->
<section class="content-header">
<h1></h1>
</section>
{% endblock %}
<!-- 身体内容  -->
{% block content %}
<!-- playvideo模态框 -->
<div class="modal fade bs-example-modeal-lg" id="playvideo" tabindex="-1" role="dialog" aria-labelledby="playvideoLabel">
<div class="modal-dialog modal-lg" role="document">
<div class="modal-content">
<div class="modal-header">
<button type="button" class="close" data-dismiss="modal" aria-label="Close"><span aria-hidden="true">×</span></button>
<h4 class="modal-title" id="addhostlLabel">录像播放</h4>
</div>
      {% csrf_token %}
<div class="modal-body">
<div class="modal-body" id="play">
</div>
</div>
<div class="modal-footer">
</div>
</div>
</div>
</div>
<!-- datatable -->
<div class="box box-default">
<div class="box-header with-border">
<h3 class="box-title">录像列表</h3>
</div>
<div class="box-body">
<table id="Videolist" class="display" style="width:100%">
<thead>
<tr>
<th>主机地址</th>
<th>操作人</th>
<th>录像文件名</th>
<th>开始时间</th>
<th>结束时间</th>
<th>操作</th>
</tr>
</thead>
<tbody>
          {% for videoli in videolist %}
<tr>
<td>{{ videoli.hostaddress }}</td>
<td>{{ videoli.username }}</td>
<td>{{ videoli.filename }}</td>
<td>{{ videoli.starttime }}</td>
<td>{{ videoli.overtime }}</td>
<td><input type="button" value="查看录像" style="float: left" class="btn btn-success" onclick="play('{{videoli.filename}}')"/></td>
</tr>
            {% endfor %}
</tbody>
</table>
</div>
</div>
{% endblock %}
<!-- JS内容  -->
{% block script %}
<script src="{% static 'adminlet-2.4.10/bower_components/datatables.net/js/jquery.dataTables.min.js' %}"></script>
<script src="{% static 'adminlet-2.4.10/bower_components/datatables.net-bs/js/dataTables.bootstrap.min.js' %}"></script>
<script src="{% static 'asciinemaplayer/asciinema-player-e90dd959bf7df7e1608c08ac419fca67.js' %}"></script>
<script type="text/JAVAscript">
//datatable配置
    $(document).ready(function() {
    $('#Videolist').DataTable({
language: {
"sProcessing": "处理中...",
"sLengthMenu": "显示 _MENU_ 项结果",
"sZeroRecords": "没有匹配结果",
"sInfo": "显示第 _START_ 至 _END_ 项结果,共 _TOTAL_ 项",
"sInfoEmpty": "显示第 0 至 0 项结果,共 0 项",
"sInfoFiltered": "(由 _MAX_ 项结果过滤)",
"sInfoPostFix": "",
"sSearch": "搜索:",
"sUrl": "",
"sEmptyTable": "表中数据为空",
"sLoadingRecords": "载入中...",
"sInfoThousands": ",",
"oPaginate": {
"sFirst": "首页",
"sPrevious": "上页",
"sNext": "下页",
"sLast": "末页"
           },
"oAria": {
"sSortAscending": ": 以升序排列此列",
"sSortDescending": ": 以降序排列此列"
           }
       },
"paging": true,       <!-- 允许分页 -->
"lengthChange": true, <!-- 允许改变每页显示的行数 -->
"searching": true,    <!-- 允许内容搜索 -->
"ordering": true,     <!-- 允许排序 -->
"info": true,         <!-- 显示信息 -->
"autoWidth": false
    });
} );
// 播放录像
function play(file) {
  $('#play').html(
'<asciinema-player id="play" src="/static/asciinemadir/'+file+'"></asciinema-player>'
  )
  $('#playvideo').modal('show');
}
</script>
{% endblock %}
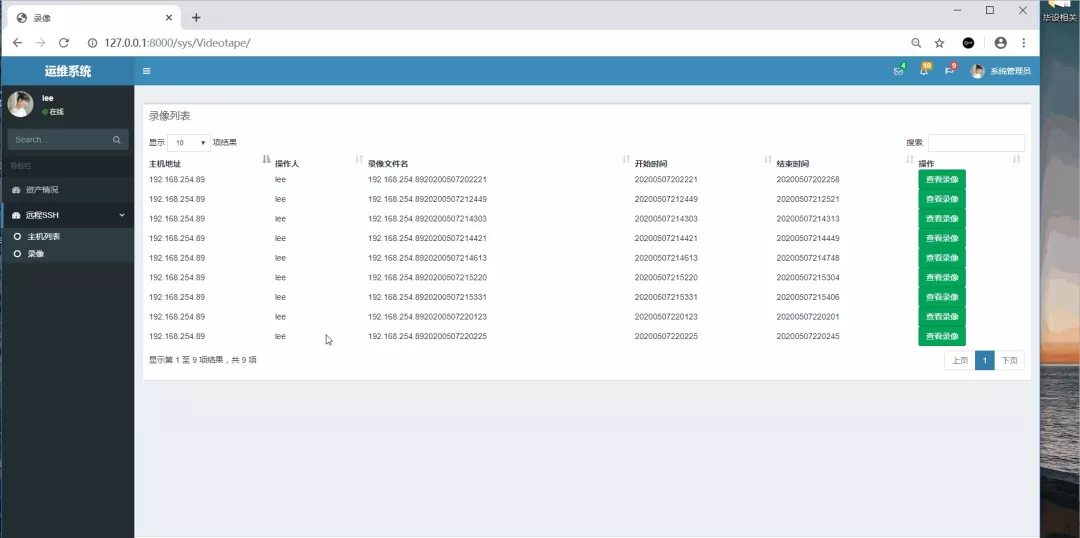
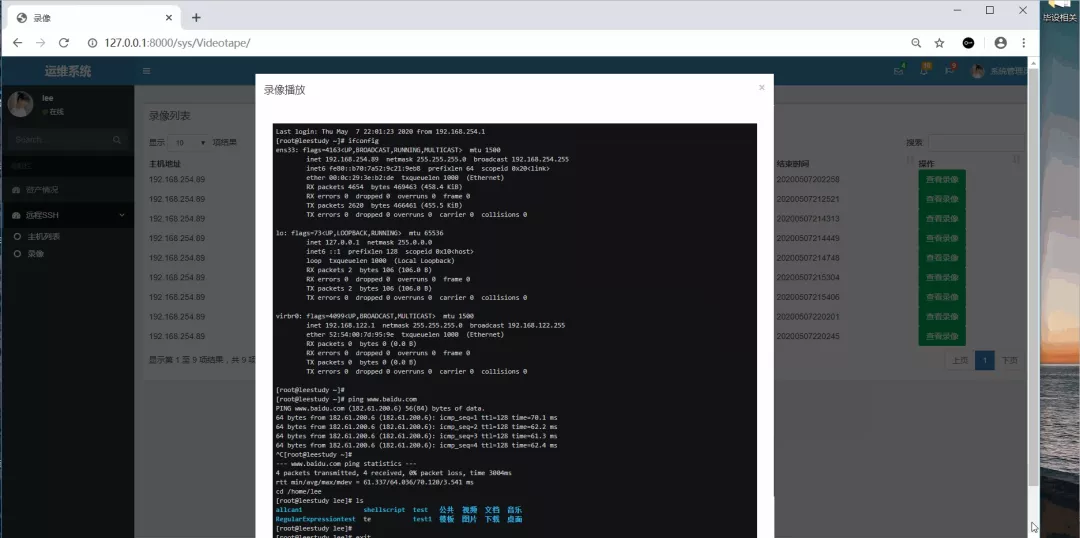
5.最终效果
结束
Django运维系统基础功能之—web远程ssh终端录像回放的功能就先介绍到这里,后面的功能再慢慢补充~本系列后面会持续更新,敬请期待哈~