揭秘Spring依赖注入和SpEL表达式
来源 | OSCHINA 社区
作者 | 华为云开发者联盟-砖业洋_
在本文中,我们深入探讨了 Spring 框架中的属性注入技术,包括 setter 注入、构造器注入、注解式属性注入,以及使用 SpEL 表达式进行属性注入。我们通过 XML 和注解两种方式,详细讲解了如何进行属性注入,并给出了完整的代码示例。无论你是 Spring 新手,还是有一定经验的开发者,本文都将帮助你理解并掌握 Spring 中的属性注入技术。
1. setter 属性注入1.1 使用 XML 进行 setter 方法注入
我们在前面的文章中已经使用过 XML 进行 setter 方法的属性注入了,下面让我们再来回顾一下:
<bean id= "userSetter"class= "com.example.demo.bean.User">
< propertyname= "username"value= "example-username-setter"/>
< propertyname= "age"value= "25"/>
</ bean>
1.2 使用 @Bean 注解进行 setter 方法注入
我们在前面的文章中也学习过如何在 bean 创建时通过编程方式设置属性:
@Bean
publicUser user{
User user = newUser;
user.setUsername( "example-username-anno-setter");
user.setAge( 25);
returnuser;
}
1.3 setter 方法注入完整代码示例
- 使用 XML 进行 setter 方法注入
首先,我们需要创建一个 User 类,并在其中包含 username 和 age 两个属性,以及相应的 getter、setter 方法和构造器。
publicclassUser{
privateString username;
privateInteger age;
publicUser{
}
// 为了节省篇幅,getter和setter方法省略......
@Override
publicString toString{
return"User{username='"+ username + "', age="+ age + "}";
}
}
对于 XML 方式的 setter 注入和构造器注入,我们需要创建一个配置文件,比如叫 ApplicationContext.xml。
< beansxmlns= "http://www.springframework.org/schema/beans"
xmlns:xsi= "http://www.w3.org/2001/XMLSchema-instance"
xsi:schemaLocation= "http://www.springframework.org/schema/beans
http://www.springframework.org/schema/beans/spring-beans.xsd" >
<!-- setter方法注入 -->
< beanid= "userSetter"class= "com.example.demo.bean.User">
< propertyname= "username"value= "example-username-setter"/>
< propertyname= "age"value= "25"/>
</ bean>
</ beans>
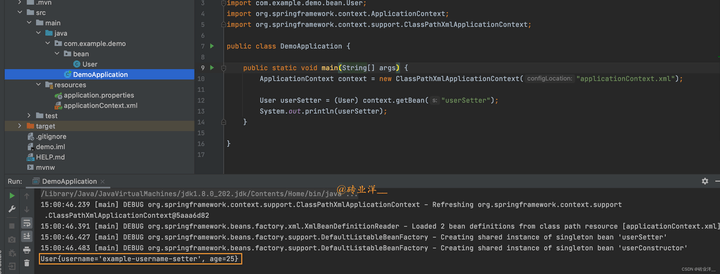
然后,我们需要创建一个 DemoApplication 类,使用 ApplicationContext 来加载配置文件并获取 Bean:
importcom.example.demo.bean.User;
importorg.springframework.context.ApplicationContext;
importorg.springframework.context.support.ClassPathXmlApplicationContext;
publicclassDemoApplication{
publicstaticvoid mAIn( String[] args) {
ApplicationContextcontext = new ClassPathXmlApplicationContext( "applicationContext.xml");
UseruserSetter = ( User) context.getBean( "userSetter");
System.out. println(userSetter);
}
}
运行结果如下:
- 使用 @Bean 注解进行 setter 方法注入
我们需要创建一个配置类,例如叫 AppConfig.JAVA:
importorg.springframework.context. annotation.Bean;
importorg.springframework.context. annotation.Configuration;
@Configuration
publicclassAppConfig{
@Bean
publicUser userSetter {
User user = new User;
user.setUsername( "example-username-anno-setter");
user.setAge( 25);
returnuser;
}
}
使用 @Bean 注解来定义 Bean。每个 @Bean 方法对应于 XML 配置中的一个 <bean> 元素。这个方法的名称就是 Bean 的 id,方法的返回值就是 Bean 的类型
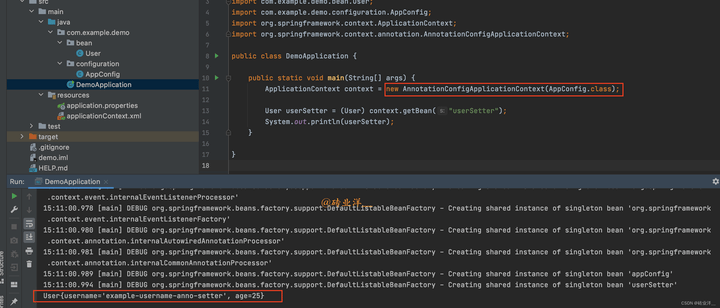
然后修改主程序,这里使用 AnnotationConfigApplicationContext 来创建 Spring 的应用上下文,并加载配置类。Spring 会自动从配置类中获取所有的 Bean 定义,并创建相应的 Bean 实例。
packagecom.example.demo;
importcom.example.demo.bean.User;
importcom.example.demo.configuration.AppConfig;
importorg.springframework.context.ApplicationContext;
importorg.springframework.context.annotation.AnnotationConfigApplicationContext;
publicclassDemoApplication{
publicstaticvoidmain(String[] args){
ApplicationContext context = newAnnotationConfigApplicationContext(AppConfig . class) ;
User userSetter = (User) context.getBean( "userSetter");
System.out.println(userSetter);
}
}
运行结果如下
注意:XML 配置方式已经相对陈旧,而且在 Spring Boot 项目中,主流的做法是使用注解和 Java 配置方式。对于 setter 注入,有时会引发循环依赖的问题。在 Spring 中,可以使用构造器注入来避免这种情况,这里了解即可。
2. 构造器注入
setter 注入是一种在对象被实例化之后(通过调用无参构造器创建实例)再通过 setter 方法注入依赖的方式。构造器注入则是在创建对象实例的时候就通过构造器参数来注入依赖。
为了演示构造器注入,我们需要给 User 添加一个全参数构造器:
publicUser(String username, Integer age) {
this.username = username;
this.age = age;
}
添加这个构造器后,Java 不再提供默认的无参构造器,这会导致我们之前的 <bean> 标签创建时失败,因为它找不到默认的构造器。
2.1 使用 XML 进行构造器注入
我们可以在 <bean> 标签内部声明一个子标签:constructor-arg。它用于指定构造器的参数,来进行属性注入。constructor-arg 标签的编写规则如下:
<bean id= "userConstructor"class= "com.example.demo.bean.User">
< constructor-argindex= "0"value= "example-username-constructor"/>
< constructor-argindex= "1"value= "25"/>
</ bean>
index 属性表示构造函数参数的位置,它的值是一个非负整数,其中 0 表示第一个参数,1 表示第二个参数,以此类推。虽然 value 属性的值总是一个字符串,但是 Spring 会尝试将它转换为构造函数参数所需的类型。例如构造函数的第二个参数是 int 类型,那么 Spring 会尝试将字符串 "25" 转换为整数 25。
使用 index 属性来指定构造函数参数的位置在大多数情况下是可以的,但是如果构造函数的参数数量或者顺序发生了改变,就可能会出错。另外一种更为可靠的方式是使用 name 属性来指定参数的名称,如:
<bean id= "userConstructor"class= "com.example.demo.bean.User">
< constructor-argname= "username"value= "example-username-constructor"/>
< constructor-argname= "age"value= "25"/>
</ bean>
这样无论参数的顺序如何,只要参数名称不变,就不会出错。
2.2 使用 @Bean 注解进行构造器属性注入
在注解驱动的 bean 注册中,我们也可以直接使用编程方式赋值:
@Bean
publicUser user{
returnnewUser( "example-username-anno-constructor", 25);
}
2.3 构造器注入的完整代码示例
- 使用 XML 进行构造器注入
首先,我们需要创建一个 User 类,并在其中包含 username 和 age 两个属性,以及相应的 getter、setter 方法和构造器。
publicclassUser{
privateString username;
privateInteger age;
publicUser{
}
publicUser(String username, Integer age){
this.username = username;
this.age = age;
}
// 为了节省篇幅,getter和setter方法省略......
@Override
publicString toString{
return"User{username='"+ username + "', age="+ age + "}";
}
}
对于 XML 方式的构造器注入,我们需要创建一个配置文件,比如叫 applicationContext.xml,这里保留 setter 注入方便大家对比
< beansxmlns= "http://www.springframework.org/schema/beans"
xmlns:xsi= "http://www.w3.org/2001/XMLSchema-instance"
xsi:schemaLocation= "http://www.springframework.org/schema/beans
http://www.springframework.org/schema/beans/spring-beans.xsd" >
<!-- setter方法注入 -->
<!-- setter方法注入 -->
<!-- <bean id="userSetter" class="com.example.demo.bean.User">-->
<!-- <property name="username" value="example-username-setter"/>-->
<!-- <property name="age" value="25"/>-->
<!-- </bean>-->
<!-- 构造器注入 -->
< beanid= "userConstructor"class= "com.example.demo.bean.User">
< constructor-argname= "username"value= "example-username-constructor"/>
< constructor-argname= "age"value= "25"/>
</ bean>
</ beans>
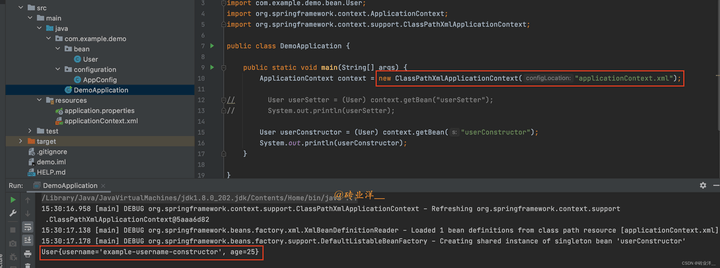
然后,我们需要创建一个 DemoApplication 类,使用 ApplicationContext 来加载配置文件并获取 Bean:
packagecom.example.demo;
importcom.example.demo.bean.User;
importorg.springframework.context.ApplicationContext;
importorg.springframework.context.support.ClassPathXmlApplicationContext;
publicclassDemoApplication{
publicstaticvoidmain(String[] args){
ApplicationContext context = newClassPathXmlApplicationContext( "applicationContext.xml");
// User userSetter = (User) context.getBean("userSetter");
// System.out.println(userSetter);
User userConstructor = (User) context.getBean( "userConstructor");
System.out.println(userConstructor);
}
}
运行结果如下:
- 使用 @Bean 注解进行构造器属性注入
我们需要创建一个配置类,例如叫 AppConfig.java:
importcom.example.demo.bean.User;
importorg.springframework.context. annotation.Bean;
importorg.springframework.context. annotation.Configuration;
@Configuration
publicclassAppConfig{
// @Bean
// public User userSetter {
// User user = new User;
// user.setUsername("example-username-anno-setter");
// user.setAge(25);
// return user;
// }
@Bean
publicUser userConstructor {
returnnew User( "example-username-anno-constructor", 25);
}
}
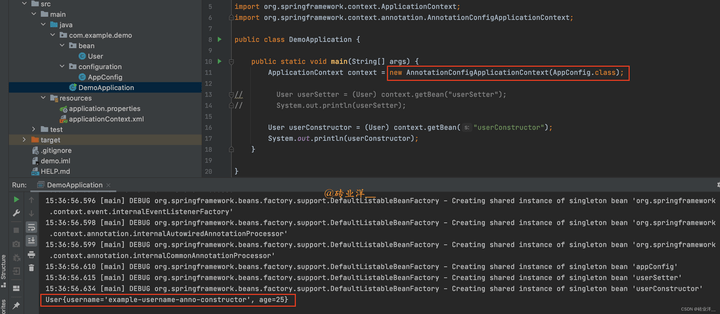
同样,我们需要创建一个 DemoApplication 类,使用 AnnotationConfigApplicationContext 来加载配置类并获取 Bean:
importcom.example.demo.bean.User;
importcom.example.demo.configuration.AppConfig;
importorg.springframework.context.ApplicationContext;
importorg.springframework.context.annotation.AnnotationConfigApplicationContext;
publicclassDemoApplication{
publicstaticvoidmain(String[] args){
ApplicationContext context = newAnnotationConfigApplicationContext(AppConfig . class) ;
// User userSetter = (User) context.getBean("userSetter");
// System.out.println(userSetter);
User userConstructor = (User) context.getBean( "userConstructor");
System.out.println(userConstructor);
}
}
运行结果:
注意:如果在类中同时使用构造器注入和 setter 注入,需要注意它们注入的顺序:先进行构造器注入,然后是 setter 注入。
3. 注解式属性注入
上面我们已经说过注解式的 setter 和构造器注入。我们又是如何处理那些通过 @Component 扫描而注册的 bean 的属性的呢?我们来仔细说说这个问题,同时展示如何在 xml 中进行相同的操作。
3.1 @Value 注解式属性注入的应用
首先,让我们从最简单的属性注入方法:@Value 开始。创建一个新的 White 类,并声明一些字段,但是这次我们不会设置 setter 方法:
@Component
publicclassWhite{
@Value( "white-value-annotation")
privateString title;
@Value( "1")
privateInteger rank;
@Override
publicString toString {
return"White{"+ "title='"+ title + '''+ ", rank="+ rank + '}';
}
}
要实现注解式属性注入,我们可以直接在需要注入的字段上添加 @Value 注解:
@ Value(" white- value- annotation")
private String title;
@ Value(" 1")
private Integer rank;
要注意的是,如果使用 @Value 注解来注入一个不存在的属性,那么应用程序会在启动时抛出异常。
然后,我们将通过组件扫描方式将这个 White 类扫描到 IOC 容器中,并将其取出并打印:
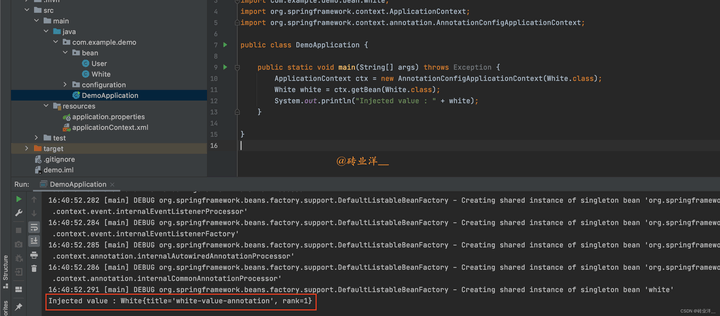
publicclassDemoApplication{
publicstaticvoidmain(String[] args)throwsException {
ApplicationContext ctx = newAnnotationConfigApplicationContext(White . class) ;
White white = ctx.getBean(White . class) ;
System.out.println( "Injected value : "+ white);
}
}
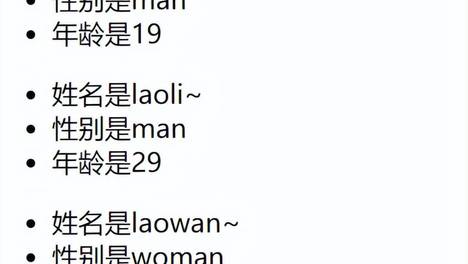
运行 main 方法会看到 White 的字段已经成功注入:
Injectedvalue : White{
title= 'white-value-annotation', rank=1}
3.2 引入外部配置文件 @PropertySource
如果我们需要在 Spring 中使用 properties 文件,我们应该怎么办呢?Spring 考虑到了这一点,并扩展了一个用于导入外部配置文件的注解:@PropertySource。
- 创建 Bean 和配置文件
创建一个新的 Blue 类,其结构与 White 类完全相同。然后在项目的 resources 目录下创建一个新的 blue.properties 文件,用于存储 Blue 类的属性配置:
blue.title=blue-value-properties
blue.rank= 2
- 引入配置文件
使用 @PropertySource 注解将 properties 文件导入到配置类:
@Configuration
@ComponentScan( "com.example")
@PropertySource( "classpath:blue.properties")
public class InjectValueConfiguration {
}
这个 blue.properties 文件是一个键值对的列表,Spring 将这些键值对加载到 Environment 中,我们可以通过 @Value 注解或者 Environment 类的方法来获取这些属性值。
@Value 注解和 Environment 类都可以用于读取 Spring 上下文中的属性值。这些属性值可能来自于多个不同的源,包括但不限于:
- Spring Boot 的默认配置文件(application.properties 或 application.yml)。
- 通过 @PropertySource 注解加载的属性文件。
- 系统环境变量。
- Java 系统属性(可以通过 -D 命令行参数设置)。
如果你想通过 @Value 注解来获取属性值,如下:
@Component
publicclassBlueConfig{
@Value( " ${blue.title}" )
privateString title;
@Value( " ${blue.rank}" )
privateint rank;
// getters and setters...
}
在 Spring 应用中使用 @PropertySource 注解来加载一个 .properties 文件时,这个文件中的所有配置项都会被读取,并存储在一个内部的 Map 结构中。这个 Map 的键是配置项的名称,值是配置项的值。Spring 中的一些内置配置项也会被添加到这个 Map 中。
当我们使用 ${...}`占位符语法来引用一个配置项时,`Spring`会查找这个`Map`,取出与占位符名称相应的配置项的值。例如有一个配置项`blue.title=blue-value-properties`,我们可以在代码中使用`${blue.title} 占位符来引用这个配置项的值。
如果想通过 Environment 类的方法来获取属性值,可以像下面这样做:
@Component
publicclassSomeComponent{
@Autowired
privateEnvironment env;
publicvoidsomeMethod{
String title = env.getProperty( "blue.title");
intrank = Integer.parseInt(env.getProperty( "blue.rank"));
// ...
}
}
在上述代码中,Environment 类的 getProperty 方法用于获取属性值。注意,getProperty 方法返回的是 String,所以如果属性是非字符串类型(如 int),则需要将获取的属性值转换为适当的类型。
注意: @PropertySource无法加载YAML格式的文件,只能加载 properties 格式的文件。如果需要加载 YAML 格式的文件,而且使用的是 Spring Boot 框架,那么可以使用 @ConfigurationProperties 或 @Value 注解。例如以下的 YAML 文件:
application.yml
appTest:
name:MyApp
version:1.0.0
可以使用 @ConfigurationProperties 来加载这些属性:
@Configuration
@ConfigurationProperties(prefix = "appTest")
public class AppConfig {
privateStringname;
privateStringversion;
// getters and setters...
}
@ConfigurationProperties 注解主要用于指定配置属性的前缀,@ConfigurationProperties 注解本身并不直接指定配置文件的位置, 而是由 Spring Boot 的自动配置机制处理的。
这样,name 字段就会被自动绑定到 appTest.name 配置属性,version 字段就会被自动绑定到 appTest.version 配置属性。
默认情况下,Spring Boot 会在启动时自动加载 src/main/resources 目录下的 application.properties 或 application.yml 文件。我们可以通过设置 spring.config.name 和 spring.config.location 属性来改变默认的配置文件名或位置。
注意:@ConfigurationProperties 注解需要配合 @EnableConfigurationProperties 注解或 @Configuration 注解使用,以确保 Spring 能够发现并处理这些注解。
或者,你也可以使用 @Value 注解来加载这些属性:
@Component
publicclassAppConfig{
@Value( " ${appTest.name}" )
privateString name;
@Value( " ${appTest.version}" )
privateString version;
// getters and setters...
}
- Blue 类的属性注入
对于 properties 类型的属性,我们这里选择 @Value 注解和占位符来注入属性:
@Value( " ${blue.title}" )
privateString title;
@Value( " ${blue.rank}" )
privateInteger rank;
如果你熟悉 jsp 的 el 表达式,会发现这和它非常相似!
- 测试启动类
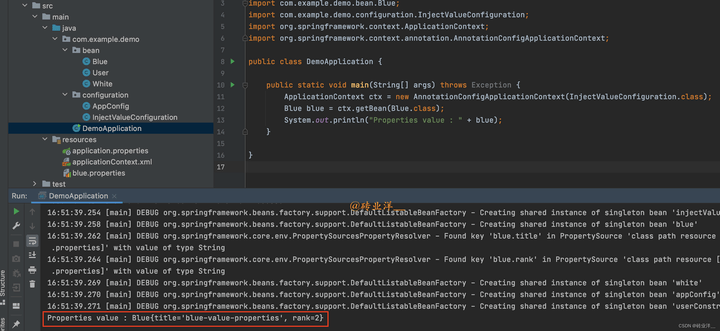
修改启动类,将配置类引入,然后取出并打印 Blue:
publicstaticvoidmain(String[] args)throwsException {
ApplicationContext ctx = newAnnotationConfigApplicationContext(InjectValueConfiguration . class) ;
Blue blue = ctx.getBean(Blue . class) ;
System.out.println( "Properties value : "+ blue);
}
运行 main 方法会看到控制台已经成功打印出了配置文件的属性:
Propertiesvalue : Blue{
title= 'blue-value-properties', rank=2}
3.3 在 XML 中引入外部配置文件
在 xml 中,我们可以和 @Value 相同的方式使用占位符:
<?xml version="1.0" encoding="UTF-8"?>
< beansxmlns= "http://www.springframework.org/schema/beans"
xmlns:xsi= "http://www.w3.org/2001/XMLSchema-instance"
xsi:schemaLocation= "http://www.springframework.org/schema/beans
http://www.springframework.org/schema/beans/spring-beans.xsd
http://www.springframework.org/schema/context
http://www.springframework.org/schema/context/spring-context.xsd"
xmlns:context= "http://www.springframework.org/schema/context">
<!-- 相当于注解中的 @PropertySource("classpath:blue.properties") -->
< context:property-placeholderlocation= "classpath:blue.properties"/>
< beanclass= "com.example.demo.bean.Blue">
< propertyname= "title"value= "${blue.title}"/>
< propertyname= "rank"value= "${blue.rank}"/>
</ bean>
</ beans>
3.4 注解式属性注入完整代码示例
- @Value 注解式属性注入的应用
创建 White 类:
packagecom.example.demo.bean;
importorg.springframework.beans.factory. annotation.Value;
importorg.springframework.stereotype.Component;
@Component
publicclassWhite{
@Value( "white-value-annotation")
privateString title;
@Value( "1")
privateInteger rank;
@Override
publicString toString {
return"White{"+ "title='"+ title + '''+ ", rank="+ rank + '}';
}
}
创建启动类 InjectValueAnnotationApplication:
packagecom.example.demo;
importcom.example.demo.bean.White;
importorg.springframework.context.ApplicationContext;
importorg.springframework.context.annotation.AnnotationConfigApplicationContext;
publicclassDemoApplication{
publicstaticvoidmain(String[] args)throwsException {
ApplicationContext ctx = newAnnotationConfigApplicationContext(White . class) ;
White white = ctx.getBean(White . class) ;
System.out.println( "Injected value : "+ white);
}
}
运行结果如下:
- 引入外部配置文件 @PropertySource
创建 Blue 类和配置文件,没有 setter 和 getter 方法:
packagecom.example.demo.bean;
importorg.springframework.beans.factory. annotation.Value;
importorg.springframework.stereotype.Component;
@Component
publicclassBlue{
@Value( " ${blue.title}" )
privateString title;
@Value( " ${blue.rank}" )
privateInteger rank;
@Override
publicString toString {
return"Blue{"+ "title='"+ title + '''+ ", rank="+ rank + '}';
}
}
resources 目录下的 blue.properties 文件:
blue.title=blue-value-properties
blue.rank= 2
创建配置类 InjectValueConfiguration:
packagecom.example.demo.configuration;
importorg.springframework.context.annotation.ComponentScan;
importorg.springframework.context.annotation.Configuration;
importorg.springframework.context.annotation.PropertySource;
@ Configuration
@ComponentScan( "com.example")
@PropertySource( "classpath:blue.properties")
public class InjectValueConfiguration {
}
修改启动类,引入配置类:
packagecom.example.demo;
importcom.example.demo.bean.Blue;
importcom.example.demo.configuration.InjectValueConfiguration;
importorg.springframework.context.ApplicationContext;
importorg.springframework.context.annotation.AnnotationConfigApplicationContext;
publicclassDemoApplication{
publicstaticvoidmain(String[] args)throwsException {
ApplicationContext ctx = newAnnotationConfigApplicationContext(InjectValueConfiguration . class) ;
Blue blue = ctx.getBean(Blue . class) ;
System.out.println( "Properties value : "+ blue);
}
}
运行结果如下:
- 在 xml 中引入外部配置文件
在使用 XML 配置的情况下,我们需要创建一个 XML 文件来替代 InjectValueConfiguration 类,我们可以先注释掉 InjectValueConfiguration 类的所有内容
下面是相应的 XML 文件内容:
<?xml version="1.0" encoding="UTF-8"?>
< beansxmlns= "http://www.springframework.org/schema/beans"
xmlns:xsi= "http://www.w3.org/2001/XMLSchema-instance"
xsi:schemaLocation= "http://www.springframework.org/schema/beans
http://www.springframework.org/schema/beans/spring-beans.xsd
http://www.springframework.org/schema/context
http://www.springframework.org/schema/context/spring-context.xsd"
xmlns:context= "http://www.springframework.org/schema/context">
<!-- 相当于注解中的 @PropertySource("classpath:blue.properties") -->
< context:property-placeholderlocation= "classpath:blue.properties"/>
< beanclass= "com.example.demo.bean.Blue">
< propertyname= "title"value= "${blue.title}"/>
< propertyname= "rank"value= "${blue.rank}"/>
</ bean>
</ beans>
在这里我们使用了 context:property-placeholder 标签来导入外部的 properties 文件,然后使用 ${...} 占位符语法来引用配置文件中的属性值。这样无论是选择用注解方式还是 XML 方式,都可以方便地在 Spring 中使用外部配置文件。
这里还需要修改下 Blue 类,因为通过 XML 方法注入属性需要提供相应的 setter 方法,修改后的 Blue 类如下:
packagecom.example.demo.bean;
importorg.springframework.beans.factory. annotation.Value;
importorg.springframework.stereotype.Component;
@Component
publicclassBlue{
@Value( " ${blue.title}" )
privateString title;
@Value( " ${blue.rank}" )
privateInteger rank;
publicString getTitle {
returntitle;
}
publicvoid setTitle(String title) {
this.title = title;
}
publicInteger getRank {
returnrank;
}
publicvoid setRank(Integer rank) {
this.rank = rank;
}
@Override
publicString toString {
return"Blue{"+ "title='"+ title + '''+ ", rank="+ rank + '}';
}
}
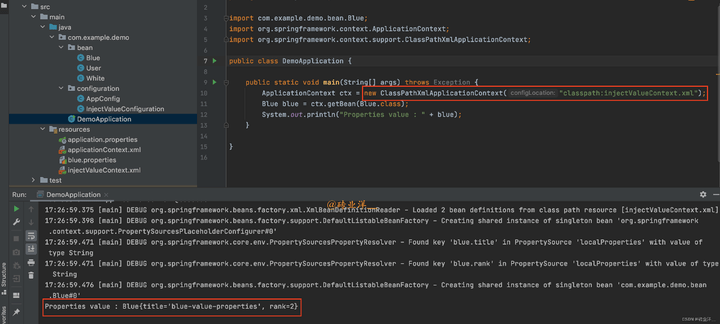
然后,我们需要修改启动类,使用 XmlApplicationContext 代替 AnnotationConfigApplicationContext:
packagecom.example.demo;
importcom.example.demo.bean.Blue;
importorg.springframework.context.ApplicationContext;
importorg.springframework.context.annotation.ComponentScan;
importorg.springframework.context.support.ClassPathXmlApplicationContext;
@ComponentScan( "com.example")
publicclassDemoApplication{
publicstaticvoidmain(String[] args)throwsException {
ApplicationContext ctx = newClassPathXmlApplicationContext( "classpath:injectValueContext.xml");
Blue blue = ctx.getBean(Blue . class) ;
System.out.println( "Properties value : "+ blue);
}
}
运行结果如下:
4. SpEL 表达式
当我们谈到属性注入的时候,我们可能会遇到一些复杂的需求,例如我们需要引用另一个 Bean 的属性,或者我们需要动态处理某个属性值。这种需求无法通过使用 ${} 的占位符方式实现,我们需要一个更强大的工具:SpEL 表达式。
Spring Expression Language(SpEL)是从 Spring 框架 3.0 开始支持的强大工具。SpEL 不仅是 Spring 框架的重要组成部分,也可以独立使用。它的功能丰富,包括调用属性值、属性参数、方法调用、数组存储以及逻辑计算等。它与开源项目 OGNL(Object-Graph Navigation Language)相似,但 SpEL 是 Spring 框架推出的,并默认内嵌在 Spring 框架中。
4.1 使用 @Value 注解和 SpEL 表达式实现属性注入
SpEL 的表达式用 #{} 表示,花括号中就是我们要编写的表达式。
我们创建一个 Bean,命名为 Azure,同样地,我们声明属性 name 和 priority,并提供 getter 和 setter 方法以及 toString 方法。然后我们使用 @Component 注解标注它。
使用 @Value 配合 SpEL 完成属性注入,如下:
@Component
publicclassAzure{
@Value( "#{'spel-for-azure'}")
privateString name;
@Value( "#{10}")
privateInteger priority;
}
我们修改启动类,从 IOC 容器中获取 Azure 并打印,可以看到属性被成功注入:
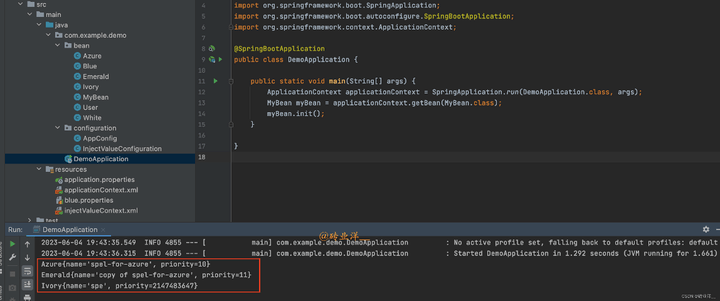
Azure{
name= 'spel-for-azure', priority=10}
SpEL 的功能远不止这些,它还可以获取 IOC 容器中其他 Bean 的属性,让我们来展示一下。
我们已经注册了 Azure Bean,现在我们再创建一个 Bean,命名为 Emerald。我们按照上述方法对字段和方法进行声明,然后使用 @Component 注解标注。
我们希望 name 属性直接复制 Azure 的 name 属性,而 priority 属性则希望比 Azure 的 priority 属性大 1,我们可以这样编写:
@Component
publicclassEmerald{
@Value( "#{'copy of ' + azure.name}")
privateString name;
@Value( "#{azure.priority + 1}")
privateInteger priority;
}
在 Spring 的 SpEL 中可以通过 bean 的名称访问到对应的 bean,并通过。操作符访问 bean 的属性。在这个例子中,azure 就是一个 bean 的名称,它对应的 bean 就是 Azure 类的实例。所以,azure.name 就是访问 Azure 类实例的 name 属性。
如果你在一个不涉及 Spring 的环境中使用 SpEL,这个特性是不会生效的。这是因为这个特性依赖于 Spring 的 IoC 容器。
我们修改启动类,测试运行,可以看到 Azure 的属性已经成功被复制:
usespel bean property : Emerald{
name= 'copy of spel-for-azure', priority= 11}
SpEL 表达式不仅可以引用对象的属性,还可以直接引用类的常量,以及调用对象的方法。下面我们通过示例进行演示。
我们新建一个 Bean,命名为 Ivory。我们按照上述方法初始化属性、toString 方法、注解。
假设我们有一个需求,让 name 取 azure 属性的前 3 个字符,priority 取 Integer 的最大值。那么我们可以使用 SpEL 这样写:
@Component
publicclassIvory{
@Value( "#{azure.name.substring(0, 3)}")
privateString name;
@Value( "#{T(java.lang.Integer).MAX_VALUE}")
privateInteger priority;
}
注意,直接引用类的属性,需要在类的全限定名外面使用 T 包围。
我们修改启动类,测试运行,可以看到 Ivory 的属性已经是处理之后的值:
usespel methods : Ivory{
name= 'spe', priority= 2147483647}
4.2 在 XML 中使用 SpEL 表达式实现属性注入:
<bean id= "ivory"class= "com.example.demo.bean.Ivory">
< propertyname= "name"value= "#{azure.name.substring(0, 3)}"/>
< propertyname= "priority"value= "#{T(java.lang.Integer).MAX_VALUE}"/>
</ bean>
学习 SpEL 表达式不需要花费大量的精力,掌握基础的使用方法即可。
4.3 SpEL 表达式属性注入完整代码示例
- 使用 @Value 注解和 SpEL 表达式实现属性注入
创建三个 SpEL 表达式属性注入的 Bean:Azure.java、Emerald.java 和 Ivory.java。
Azure.java:
packagecom.example.demo.bean;
importorg.springframework.beans.factory. annotation.Value;
importorg.springframework.stereotype.Component;
@Component
publicclassAzure{
@Value( "#{'spel-for-azure'}")
privateString name;
@Value( "#{10}")
privateInteger priority;
publicString getName {
returnname;
}
publicvoid setName(String name) {
this.name = name;
}
publicInteger getPriority {
returnpriority;
}
publicvoid setPriority(Integer priority) {
this.priority = priority;
}
@Override
publicString toString {
return"Azure{"+
"name='"+ name + '''+
", priority="+ priority +
'}';
}
}
Emerald.java:
packagecom.example.demo.bean;
importorg.springframework.beans.factory. annotation.Value;
importorg.springframework.stereotype.Component;
@Component
publicclassEmerald{
@Value( "#{'copy of ' + azure.name}")
privateString name;
@Value( "#{azure.priority + 1}")
privateInteger priority;
publicString getName {
returnname;
}
publicvoid setName(String name) {
this.name = name;
}
publicInteger getPriority {
returnpriority;
}
publicvoid setPriority(Integer priority) {
this.priority = priority;
}
@Override
publicString toString {
return"Emerald{"+
"name='"+ name + '''+
", priority="+ priority +
'}';
}
}
Ivory.java:
packagecom.example.demo.bean;
importorg.springframework.beans.factory. annotation.Value;
importorg.springframework.stereotype.Component;
@Component
publicclassIvory{
@Value( "#{azure.name.substring(0, 3)}")
privateString name;
@Value( "#{T(java.lang.Integer).MAX_VALUE}")
privateInteger priority;
publicString getName {
returnname;
}
publicvoid setName(String name) {
this.name = name;
}
publicInteger getPriority {
returnpriority;
}
publicvoid setPriority(Integer priority) {
this.priority = priority;
}
@Override
publicString toString {
return"Ivory{"+
"name='"+ name + '''+
", priority="+ priority +
'}';
}
}
MyBean.java
@Component
publicclassMyBean{
@Autowired
privateAzure azure;
@Autowired
privateEmerald emerald;
@Autowired
privateIvory ivory;
publicvoid init{
System. out.println(azure);
System. out.println(emerald);
System. out.println(ivory);
}
}
MyBean 是一个用于展示如何在 Spring 中通过 SpEL 表达式来注入属性的类,它聚合了三个对象 Azure, Emerald 和 Ivory,并通过 Spring 的依赖注入机制将这三个对象注入到了 MyBean 类的实例中
主程序 DemoApplication
@SpringBootApplication
publicclassDemoApplication{
publicstaticvoidmain(String[] args){
ApplicationContext applicationContext = SpringApplication.run(DemoApplication . class, args) ;
MyBean myBean = applicationContext.getBean(MyBean . class) ;
myBean.init;
}
}
运行结果:
- 在 XML 中使用 SpEL 表达式实现属性注入
对于 XML 配置,Spring 还支持在 bean 定义中使用 SpEL。
首先,需要创建一个 Spring XML 配置文件,我们将其命名为 app-config.xml:
<?xml version="1.0" encoding="UTF-8"?>
< beansxmlns= "http://www.springframework.org/schema/beans"
xmlns:xsi= "http://www.w3.org/2001/XMLSchema-instance"
xmlns:context= "http://www.springframework.org/schema/context"
xsi:schemaLocation= "http://www.springframework.org/schema/beans
http://www.springframework.org/schema/beans/spring-beans.xsd
http://www.springframework.org/schema/context
http://www.springframework.org/schema/context/spring-context.xsd" >
< context:component-scanbase-package= "com.example"/>
< beanid= "azure"class= "com.example.demo.bean.Azure">
< propertyname= "name"value= "#{
'spel-for-azure'}" />
< propertyname= "priority"value= "#{10}"/>
</ bean>
< beanid= "emerald"class= "com.example.demo.bean.Emerald">
< propertyname= "name"value= "#{
'copy of ' + azure.name}" />
< propertyname= "priority"value= "#{azure.priority + 1}"/>
</ bean>
< beanid= "ivory"class= "com.example.demo.bean.Ivory">
< propertyname= "name"value= "#{azure.name.substring(0, 3)}"/>
< propertyname= "priority"value= "#{T(java.lang.Integer).MAX_VALUE}"/>
</ bean>
</ beans>
注意:在 XML 中使用 SpEL 需要使用 #{},而不是 ${}。
然后修改这 3 个 Bean,如果是使用 XML 来配置 Spring 的 Bean 的话,那么在 Java 类中就不需要使用 @Component 注解了。因为 XML 配置文件已经明确地告诉 Spring 这些类是 Spring Bean。
同样的,如果在 XML 文件中定义了 Bean 的属性值,那么在 Java 类中就不需要使用 @Value 注解来注入这些值了。因为 XML 配置文件已经明确地为这些属性赋了值。
Azure.java
packagecom.example.demo.bean;
publicclassAzure{
privateString name;
privateInteger priority;
publicString getName{
returnname;
}
publicvoidsetName(String name){
this.name = name;
}
publicInteger getPriority{
returnpriority;
}
publicvoidsetPriority(Integer priority){
this.priority = priority;
}
@Override
publicString toString{
return"Azure{"+
"name='"+ name + '''+
", priority="+ priority +
'}';
}
}
Emerald.java
packagecom.example.demo.bean;
publicclassEmerald{
privateString name;
privateInteger priority;
publicString getName{
returnname;
}
publicvoidsetName(String name){
this.name = name;
}
publicInteger getPriority{
returnpriority;
}
publicvoidsetPriority(Integer priority){
this.priority = priority;
}
@Override
publicString toString{
return"Emerald{"+
"name='"+ name + '''+
", priority="+ priority +
'}';
}
}
Ivory.java
packagecom.example.demo.bean;
publicclassIvory{
privateString name;
privateInteger priority;
publicString getName{
returnname;
}
publicvoidsetName(String name){
this.name = name;
}
publicInteger getPriority{
returnpriority;
}
publicvoidsetPriority(Integer priority){
this.priority = priority;
}
@Override
publicString toString{
return"Ivory{"+
"name='"+ name + '''+
", priority="+ priority +
'}';
}
}
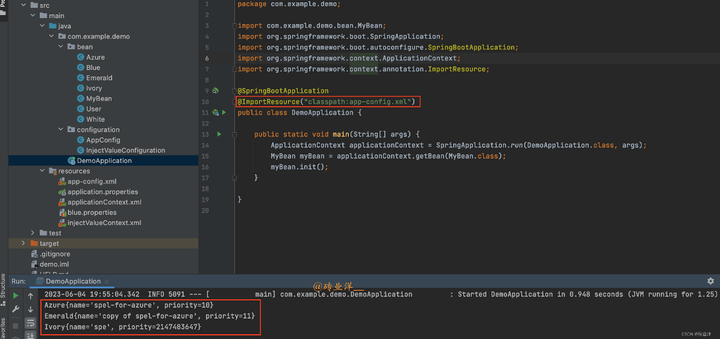
然后需要在主程序中导入这个 XML 配置文件,这可以通过在主程序中添加 @ImportResource 注解实现:
packagecom.example.demo;
importcom.example.demo.bean.MyBean;
importorg.springframework.boot.SpringApplication;
importorg.springframework.boot.autoconfigure.SpringBootApplication;
importorg.springframework.context.ApplicationContext;
importorg.springframework.context. annotation.ImportResource;
@SpringBootApplication
@ImportResource( "classpath:app-config.xml")
publicclassDemoApplication{
publicstatic void main(String[] args) {
ApplicationContext applicationContext = SpringApplication.run(DemoApplication . class, args);
MyBean myBean = applicationContext.getBean(MyBean . class);
myBean. init;
}
}
这样就可以在 Spring 的 XML 配置文件中使用 SpEL 了。
运行结果如下:
END