Linux 在线和离线安装 MySQL
1 linux的常用软件安装
配置阿里云的yum源
1) 安装wget
[root@localhost ~]# yum -y install wget
2)下载yum源的配置文件
[root@localhost ~]# wget http://mirrors.aliyun.com/repo/centos-7.repo
3) 替换原有的yum源
[root@localhost ~]# mv /etc/yum.repos.d/CentOS-Base.repo ~/     <-- 备份原有的到root的家目录
[root@localhost ~]# mv ~/Centos-7.repo /etc/yum.repos.d/CentOS-Base.repo <-- 将下载的yum配置文件放在系统的指定目录
4) 更新现有yum
[root@localhost ~]# yum clean all && yum makecache && yum -y update
5) 安装常用软件
[root@localhost ~]# yum -y install openssh-server vim gcc gcc-c++ glibc-headers bzip2-devel lzo-devel curl lrzsz openssh-clients zlib zlib-devel make autoconf automake cmake libtool openssl openssl-devel fuse-devel snAppy-devel te.NET unzip zip net-tools.x86_64 firewalld systemd ntp
2 linux的JDK安装
此处我们选用 jdk1.8_144这个版本作为我们的基础JDK,此处要切记一点的是1.8的不同版本JDK在配置上会有很大的出入,所以请不要随便更换基础的JDK版本,否则你会很尴尬!
使用 rz 上传jdk到root的家目录
[root@localhost ~]# rz
使用rpm命令安装jdk
[root@localhost ~]# rpm -ivh jdk-8u144-linux-x64.rpm
配置jdk的环境变量
[root@localhost ~]# vi /etc/profile
export JAVA_HOME=/usr/java/jdk1.8.0_144
export JRE_HOME=$JAVA_HOME/jre
export PATH=$PATH:$JAVA_HOME/bin
export CLASSPATH=.:$JAVA_HOME/lib/dt.jar:$JAVA_HOME/lib/tools.jar
刷新环境变量
[root@localhost ~]# source /etc/profile
[root@localhost ~]# echo $PATH
/usr/local/sbin:/usr/local/bin:/usr/sbin:/usr/bin:/root/bin:/usr/java/jdk1.8.0_144/bin
[root@localhost ~]# java -version
java version "1.8.0_144"
Java(TM) SE Runtime Environment (build 1.8.0_144-b01)
Java HotSpot(TM) 64-Bit Server VM (build 25.144-b01, mixed mode)
到此 JDK安装完成
3 安装MySQL前说明
本例安装MySQL版本是 5.7
4 linux 在线安装MySQL
用root用户安装
1)获取mysql 源安装包
wget https://dev.mysql.com/get/mysql57-community-release-el7-11.noarch.rpm

2)安装mysql 源
rpm -ivh mysql57-community-release-el7-11.noarch.rpm
3)检查mysql源是否安装成功
yum repolist enabled | grep "mysql.-community."

3)用 yum 命令安装mysql
yum install mysql-community-server
4)修改mysql的配置文件
查看MYSQL配置文件加载顺序:
mysqld --help --verbose|grep -A1 -B1 cnf 
修改/etc/my.cnf 配置文件内的文件目录
datadir=/data/mysql/data
sql_mode=STRICT_TRANS_TABLES,NO_AUTO_CREATE_USER,NO_ENGINE_SUBSTITUTION
log-error=/data/mysql/log/mysqld.log
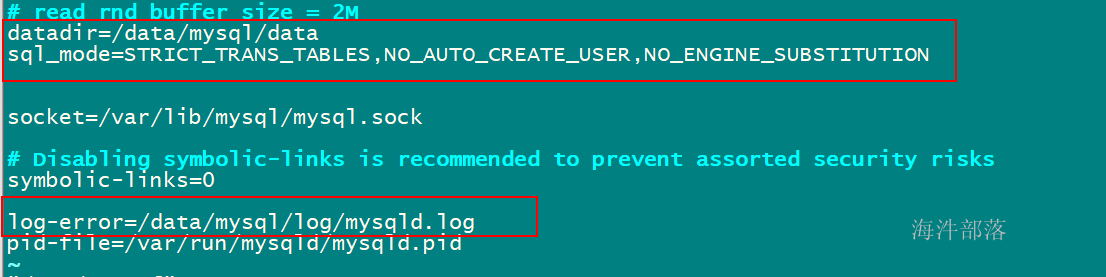
其中:
SQL_MODE:通过对其正确的设置可以完成一些约束检查的工作,设置时,在配置文件my.cnf 中配置进行全局的设置。
STRICT_TRANS_TALES(严格模式):
只对支持事务的表启用严格模式。
NO_AUTO_CREATE_USER:
禁止GRANT创建密码为空的用户。
NO_ENGINE_SUBSTITUTION:
启用后,若需要的存储引擎被禁用或未编译,则抛出错误;未启用时将用默认的存储引擎代替,并抛出一个异常。
5)创建mysql 文件目录
[root@localhost jar]# mkdir -p /data/mysql/data
[root@localhost jar]# mkdir -p /data/mysql/log
6)生成首次登录随机密码
mysqld --initialize
通过上面命令会在
/data/mysql/log/mysqld.log 中生成随机码,随机码用来首次登录mysql。

7)修改mysql 文件目录所有者为 mysql 用户
chown -R mysql:mysql /data/mysql
8)启动mysql
systemctl start mysqld.service
9) 关闭并重启mysql(可选)
systemctl stop mysqld.service
systemctl start mysqld.service
如果再次启动报错,就重启Linux 系统。
10)用生成的随机密码登录mysql
mysql -uroot -p'ujkq0>4*/yMD'
登录后进入mysql 命令行
11)修改ROOT用户密码
set password=PASSWORD('12345678');
设置完密码后,需要用新密码重新登录
12)卸载mysql(不是必须的)
如果启动报错,根据错误查看原因,如果实在解决不了,卸载mysql 重新装。
查看已经安装过的组件
rpm -qa | grep -i mysql

用yum -y remove 卸载所有mysqlyum -y remove
mysql57-community-release-el7-11.noarch yum -y remove mysql-community-common-5.7.19-1.el7.x86_64
卸载后再用 rpm -qa | grep -i mysql 查看,直至全部卸载
删除/data/mysql 目录
rm -rf /data/mysql
5 linux 离线安装MySQL
1) 卸载CentOS7系统自带mariadb
# 查看系统自带的Mariadb
[root@localhost ~]# rpm -qa|grep mariadb
mariadb-libs-5.5.64-1.el7.x86_64
# 卸载系统自带的Mariadb
[root@localhost ~]# rpm -e --nodeps mariadb-libs-5.5.64-1.el7.x86_64
# 删除etc目录下的my.cnf(如果有就删除,可以执行试一下,没有会提示你的)
[root@localhost ~]# rm /etc/my.cnf
2) 检查mysql是否存在
# 检查是否已经安装
[root@localhost ~]# rpm -qa | grep mysql
# 如果什么都没有返回 空的 说明啥也没安 可以继续安装
3) 检查mysql的用户和组是否存在如果不存在就创建
# 检查有没有mysql用户
[root@localhost ~]# cat /etc/passwd | grep mysql
# 检查有没有mysql组
[root@localhost ~]# cat /etc/group | grep mysql
# 查询全部用户
[root@localhost ~]# cat /etc/passwd|grep -v nologin|grep -v halt|grep -v shutdown|awk -F ":" '{print $1 "|" $3 "1" $4}' | more
# 如果不存在就创建mysql用户
# 创建mysql用户组
[root@localhost ~]# groupadd mysql
# 创建一个用户名为mysql的用户,并加入mysql用户组
[root@localhost ~]# useradd -g mysql mysql
# 设置mysql的密码 000000
[root@localhost ~]# passwd mysql
更改用户 mysql 的密码 。
新的 密码:
无效的密码: 密码是一个回文
重新输入新的 密码:
passwd:所有的身份验证令牌已经成功更新。
4) 下载MySQL的离线安装包
官网下载地址:
https://dev.mysql.com/downloads/mysql/5.7.html#downloads
版本选择,可以选择一下两种方式:
1)使用Red Hat Enterprise Linux
Select Version: 5.7.* (因为更新的缘故具体细节版本可自行查看)
Select Operating System: Red Hat Enterprise Linux / Oracle Linux
Select OS Version: Red Hat Enterprise Linux 7 / Oracle Linux 7 (x86, 64-bit)
列表中下载:
Compressed TAR Archive:(
mysql-5.7.25-el7-x86_64.tar.gz) 【本文中使用的是这个版本】
2)使用Linux - Generic
Select Version: 5.7.* (因为更新的缘故具体细节版本可自行查看)
Select Operating System: Linux - Generic
Select OS Version: Linux - Generic (glibc 2.12) (x86, 64-bit)
列表中下载:
Compressed TAR Archive:(mysql-5.7.25-linux-glibc2.12-x86_64.tar.gz)
注意:上边两种方式找mysql离线安装包的方式都可以。
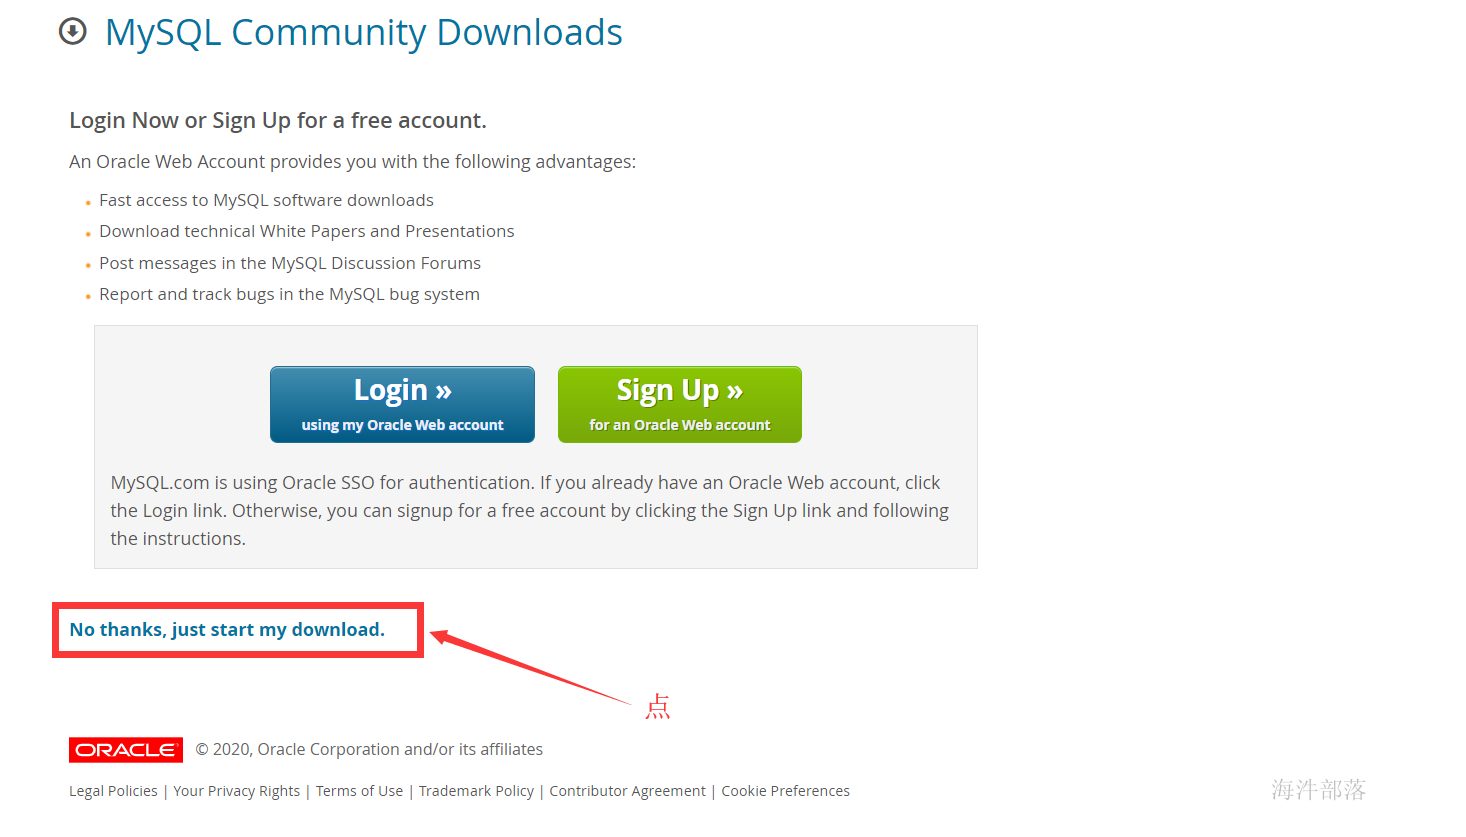
选完跳到以下这个页面点击 下面的连接就可以开始下载了
5) 上传MySQL的离线安装包并解压进行传统配置
# 将mysql解压到 /usr/local 下
[root@localhost mysoft]# tar -zxvf mysql-5.7.29-el7-x86_64.tar.gz -C /usr/local/
# 创建软连接
[root@localhost local]# ln -s mysql-5.7.29-el7-x86_64 mysql
# 修改目录与软件连的所属用户和组
[root@localhost local]# chown -R mysql:mysql mysql-5.7.29-el7-x86_64
[root@localhost local]# chown -h mysql:mysql mysql
# 创建mysql的数据目录
# 进入mysql(cd /usr/local/mysql)
[root@localhost local]# cd mysql
# 创建 data 目录
[root@localhost mysql]# mkdir data
# 目录赋权
[root@localhost mysql]# chown mysql:mysql ./data
6) 创建配置文件
[root@localhost local]# cd mysql
[root@localhost mysql]# vim my.cnf
(内容如下 : )
[mysql]
socket=/var/lib/mysql/mysql.sock
# set mysql client default chararter
default-character-set=utf8
[mysqld]
socket=/var/lib/mysql/mysql.sock
# set mysql server port
port = 3306
# set mysql install base dir
basedir=/usr/local/mysql
# set the data store dir
datadir=/usr/local/mysql/data
# set sql mode
sql_mode=STRICT_TRANS_TABLES,NO_AUTO_CREATE_USER,NO_ENGINE_SUBSTITUTION
# set the number of allow max connnection
max_connections=200
# set server charactre default encoding
character-set-server=utf8
# the storage engine
default-storage-engine=INNODB
lower_case_table_names=1
max_allowed_packet=16M
explicit_defaults_for_timestamp=true
[mysql.server]
user=mysql
basedir=/usr/local/mysql
7) 开始安装MySQL
[root@localhost mysql]# cd /usr/local/mysql
[root@localhost mysql]# bin/mysql_install_db --user=mysql --basedir=/usr/local/mysql/ --datadir=/usr/local/mysql/data/
2020-02-12 15:14:15 [WARNING] mysql_install_db is deprecated. Please consider switching to mysqld --initialize
2020-02-12 15:14:20 [WARNING] The bootstrap log isn't empty:
2020-02-12 15:14:20 [WARNING] 2020-02-12T07:14:16.103773Z 0 [Warning] --bootstrap is deprecated. Please consider using --initialize instead
2020-02-12T07:14:16.104788Z 0 [Warning] Changed limits: max_open_files: 1024 (requested 5000)
2020-02-12T07:14:16.104795Z 0 [Warning] Changed limits: table_open_cache: 431 (requested 2000)
设置权限
[root@localhost mysql]# cp ./support-files/mysql.server /etc/init.d/mysqld
[root@localhost mysql]# chown 777 my.cnf
[root@localhost mysql]# chmod +x /etc/init.d/mysqld
8) 启动MySQL
[root@localhost mysql]# mkdir -p /var/lib/mysql
[root@localhost mysql]# chown -R mysql:mysql /var/lib/mysql
# 启动一次
[root@localhost mysql]# /etc/init.d/mysqld restart
 ERROR! MySQL server PID file could not be found!
Starting MySQL.Logging to '/usr/local/mysql/data/localhost.localdomain.err'.
 SUCCESS!
# 再启动一次
[root@localhost mysql]# /etc/init.d/mysqld restart
Shutting down MySQL.. SUCCESS!
Starting MySQL. SUCCESS!
9) 设置开机启动
[root@localhost mysql]# chkconfig --level 35 mysqld on
[root@localhost mysql]# chkconfig --list mysqld
注:该输出结果只显示 SysV 服务,并不包含
原生 systemd 服务。SysV 配置数据
可能被原生 systemd 配置覆盖。
      要列出 systemd 服务,请执行 'systemctl list-unit-files'。
      查看在具体 target 启用的服务请执行
      'systemctl list-dependencies [target]'。
mysqld          0:关    1:关    2:开    3:开    4:开    5:开    6:关
[root@localhost mysql]# chmod +x /etc/rc.d/init.d/mysqld
[root@localhost mysql]# chkconfig --add mysqld
[root@localhost mysql]# chkconfig --list mysqld
注:该输出结果只显示 SysV 服务,并不包含
原生 systemd 服务。SysV 配置数据
可能被原生 systemd 配置覆盖。
      要列出 systemd 服务,请执行 'systemctl list-unit-files'。
      查看在具体 target 启用的服务请执行
      'systemctl list-dependencies [target]'。
mysqld          0:关    1:关    2:开    3:开    4:开    5:开    6:关
[root@localhost mysql]# service mysqld status
 SUCCESS! MySQL running (60791)
10) 修改配置文件
[root@localhost mysql]# vim /etc/profile
添加一行 export PATH=$PATH:/usr/local/mysql/bin
[root@localhost mysql]# source /etc/profile
11) 获取初始密码
获取初始密码
[root@localhost mysql]# cat /root/.mysql_secret
# Password set for user 'root@localhost' at 2020-02-12 15:14:15
Qba3P)r#ft_>
创建软连接
[root@localhost mysql]# ln -s /var/lib/mysql/mysql.sock /tmp/mysql.sock
登录mysql
[root@localhost tmp]# mysql -uroot -p'Qba3P)r#ft_>'
修改密码
[root@localhost tmp]# mysql -uroot -p'Qba3P)r#ft_>'
mysql: [Warning] Using a password on the command line interface can be insecure.
Welcome to the MySQL monitor.  Commands end with ; or g.
Your MySQL connection id is 2
Server version: 5.7.29
Copyright (c) 2000, 2020, Oracle and/or its affiliates. All rights reserved.
Oracle is a registered trademark of Oracle Corporation and/or its
affiliates. Other names may be trademarks of their respective
owners.
Type 'help;' or 'h' for help. Type 'c' to clear the current input statement.
mysql> set PASSWORD = PASSWORD('000000');
Query OK, 0 rows affected, 1 warning (0.00 sec)
检验密码是否成功
mysql> exit
Bye
[root@localhost tmp]# mysql -uroot -p000000
mysql: [Warning] Using a password on the command line interface can be insecure.
Welcome to the MySQL monitor.  Commands end with ; or g.
Your MySQL connection id is 3
Server version: 5.7.29 MySQL Community Server (GPL)
Copyright (c) 2000, 2020, Oracle and/or its affiliates. All rights reserved.
Oracle is a registered trademark of Oracle Corporation and/or its
affiliates. Other names may be trademarks of their respective
owners.
Type 'help;' or 'h' for help. Type 'c' to clear the current input statement.
mysql>
设置远程访问
[root@localhost tmp]# mysql -uroot -p000000
mysql: [Warning] Using a password on the command line interface can be insecure.
Welcome to the MySQL monitor.  Commands end with ; or g.
Your MySQL connection id is 3
Server version: 5.7.29 MySQL Community Server (GPL)
Copyright (c) 2000, 2020, Oracle and/or its affiliates. All rights reserved.
Oracle is a registered trademark of Oracle Corporation and/or its
affiliates. Other names may be trademarks of their respective
owners.
Type 'help;' or 'h' for help. Type 'c' to clear the current input statement.
mysql> grant all privileges on *.* to 'root'@'%' identified by '000000';
Query OK, 0 rows affected, 1 warning (0.00 sec)
mysql> grant all privileges on *.* to 'root'@'localhost' identified by '000000';
Query OK, 0 rows affected, 1 warning (0.00 sec)
mysql> flush privileges;
Query OK, 0 rows affected (0.00 sec)
海汼部落原创文章,原文链接:(
http://hainiubl.com/topics/75580)